| layout | title | category | summery |
|---|---|---|---|
blog |
Kubernetes: The Future of Cloud Hosting |
blog |
In this article, I'm going to introduce you one of the hottest project in the Docker community called Kubernetes. It allows you to manage a cluster of containers. |
Before we begin, let me first tell you what I mean by cloud hosting. This is quite a complex topic because there are several meanings to cloud hosting. We can talk about Heroku-like deployment services. Or we can talk about infrastructure services like AWS EC2. Or we can talk about Docker and other container technologies.
All of the above solutions will evolve and become mature. But I believe that in the future, just like most of us use Linux for servers, Kubernetes will be the choice for cloud hosting. Okay, what's Kubernetes and why do I say this? Let's have a look at it.
Kubernetes is Google's solution for managing a cluster of containers. Currently it only supports Docker for containers. But in the future it'll support other container solutions as well.
If you are new to Docker and containers, first read my blog post about Docker and Container Wars.
Kubernetes provides a declarative API for managing clusters while giving us a lot of flexibility. You only need to tell it what to do and it'll do the hard work for you. It has built-in support for microservices, load balancing, monitoring and so on. You can deploy any service you like into Kubernetes. There are also some services with built-in Kubernetes support. Cassandra, RethinkDB and Spark are some of them.
On the other hand, it's an open technology and you can run Kubernetes anywhere you like. That's the goal of Kubernetes but we are not 100% there yet. Services like TecTonic makes this achievable and I hope most of the hosting providers will support Kubernetes natively in the future.
Here's why I think Kubernetes is the future of cloud hosting:
- Its API is declarative and it gives us a lot of flexibility.
- Developers can integrate Kubernetes into their own services and make them native to Kubernetes.
- Infrastructure providers can implement Kubernetes on top of their infrastructure without much effort.
- It's an open technology, so there is no vendor lock in.
- It's supported by major players including Google, IBM, HP, VMWare, Microsoft and others.
You may think this is just another technology. That's why I asked you to give it a try. That's the intention of this article. Let's start.
It's very important to learn a few core concepts first. Don't worry I'll keep them short.
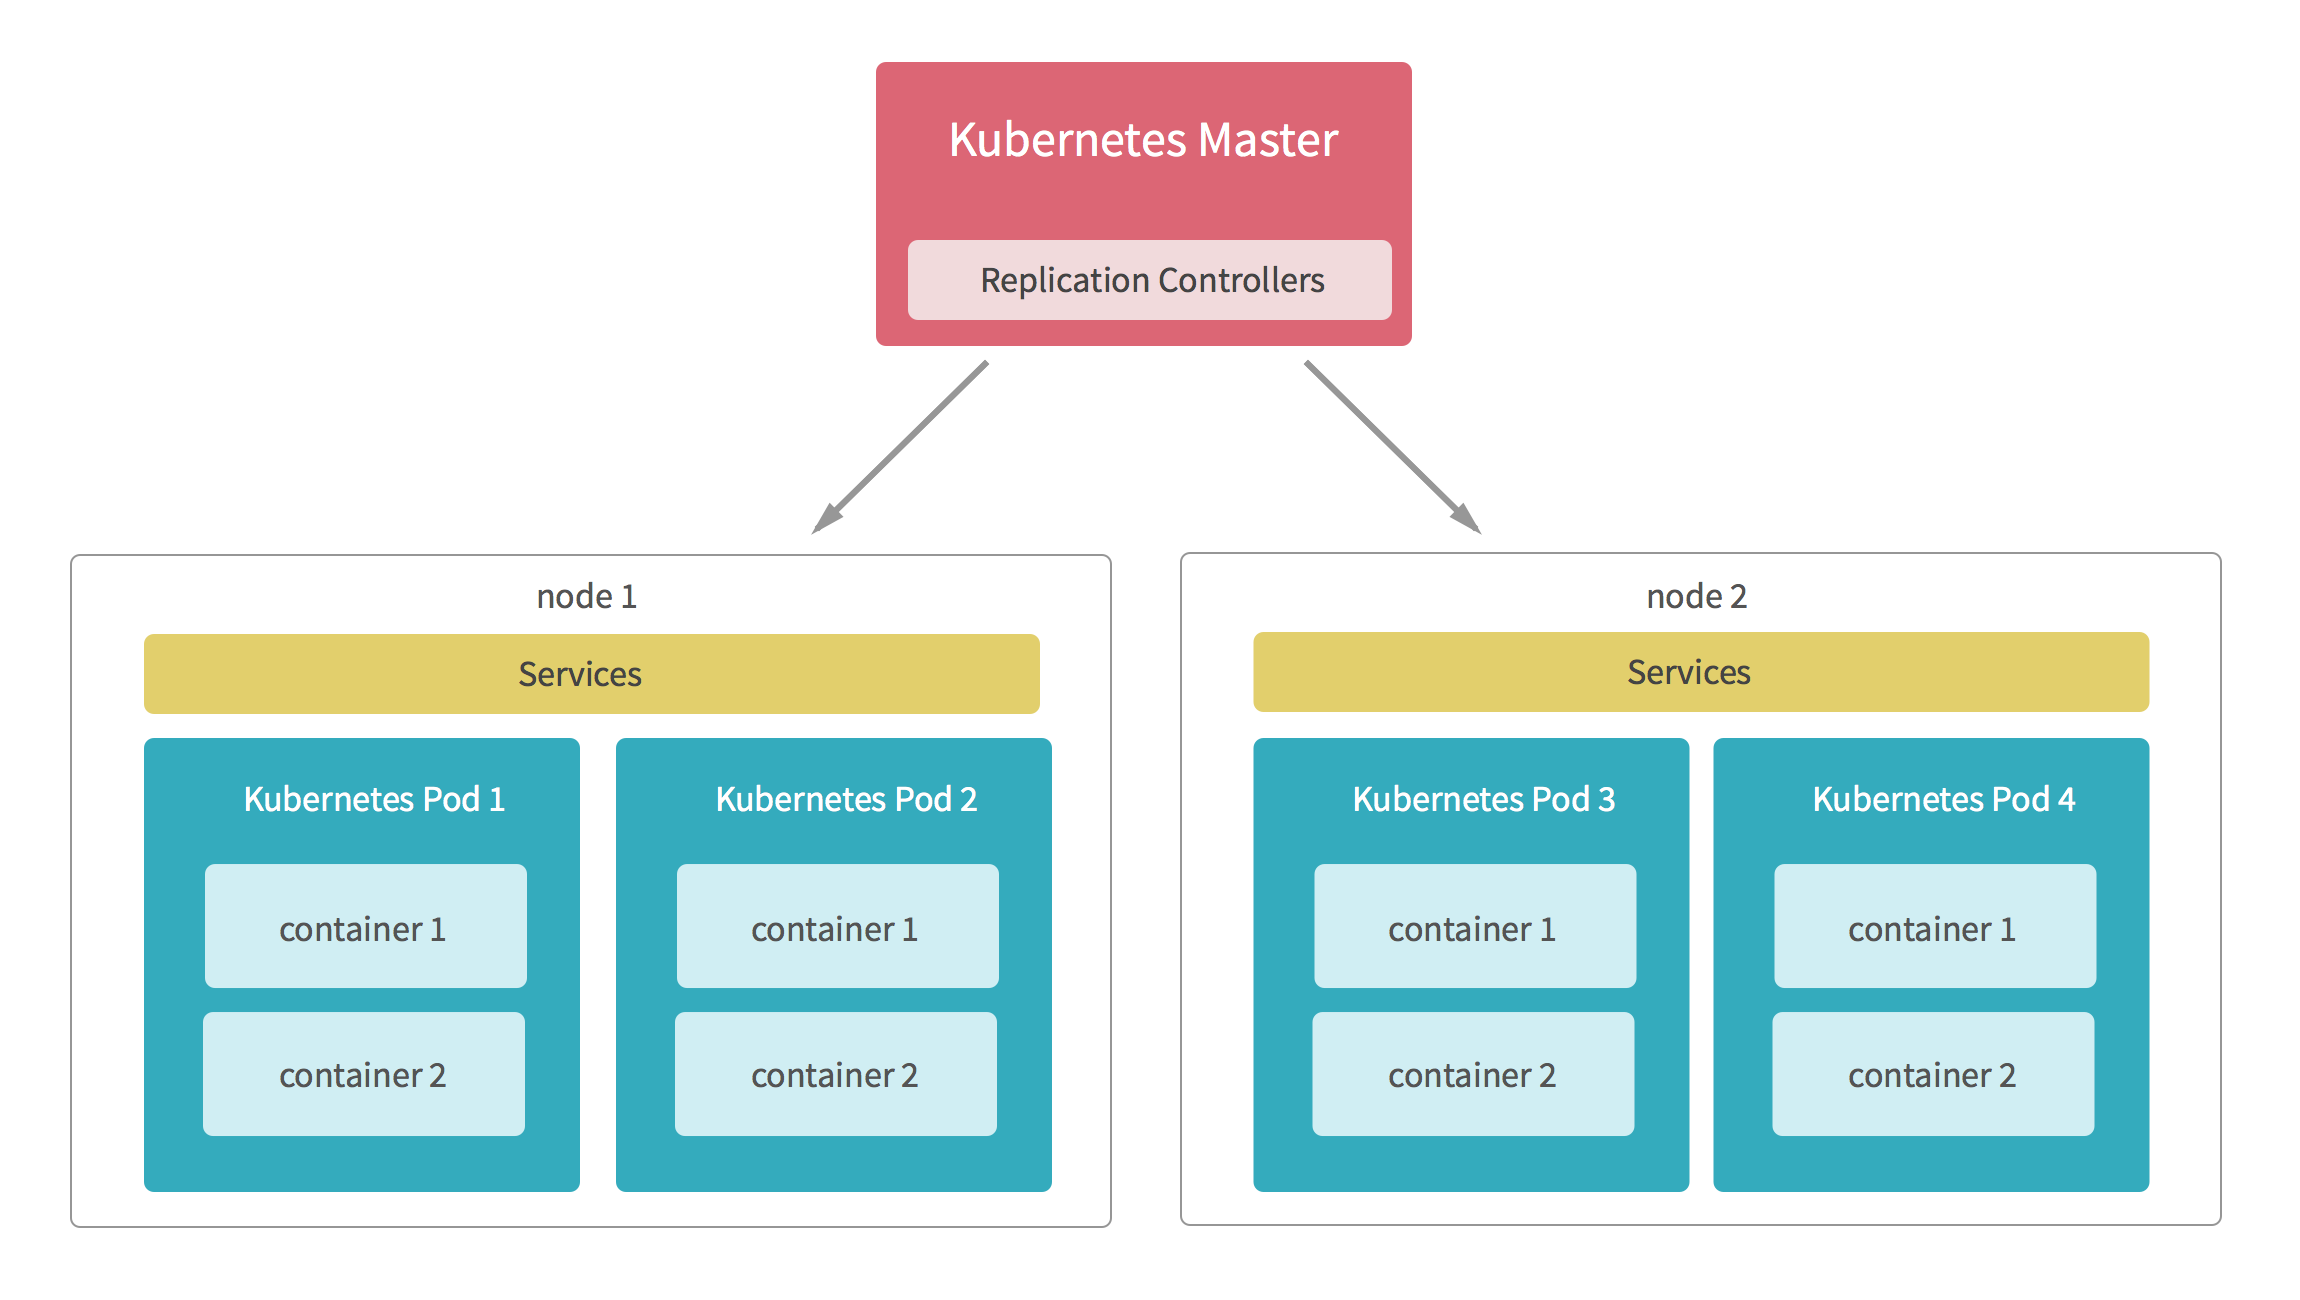
Kubernetes Master controls the overall cluster and runs the API for the cluster. Basically, it takes care of everything in the cluster.
A Node is a physical server (or a VM) inside the cluster. It communicates with the master and runs containers (actually pods). You can add and remove any number of nodes you like.
A pod is the basic building block in Kubernetes. Inside a pod, you can run a set of containers. We can allocate CPU, memory, volumes and other resources to a pod. All the containers inside the pod can share them. Kubernetes also assigns a unique network namespace to each pod. So, you don't need to worry about conflicting ports because every pod has its own IP address and a hostname.
Even though a pod is a very powerful component, it can't handle failures itself. Let's say the node (server) running our pod crashed. Then our pod will be removed from the cluster too. But, this is not the behavior we want. Failures are inevitable and even in such situations, we need to provide our service to the customers. That's what the replication controller does.
It watches the cluster and ensures that a given number of pods are running in the cluster all the time. It can launch new pods and remove existing pods. We can also change the number of pods assigned to a replication controller.
For this to function, we need to define our pod as a template inside the replication controller.
We know, pods are added and removed. So, we need a way to load-balance our traffic into these pods. “Service” is the solution. It can act as a dynamic load balancer for a set of pods. It's very efficient and uses IP tables and other techniques to avoid the load-balancing overhead.
Services also comes with basic sticky session support.
Additionally, you can access these services via the DNS from inside each pod inside the cluster. So, it acts as a backbone for microservices.
Enough talking! Let's deploy a Kubernetes cluster.
You will need a basic understanding of Linux and related tools to follow the rest of the article.
Deploying a real cluster is a hard job and takes some effort. So, we are going to deploy a test cluster inside a single server. You'll need a Ubuntu 64-bit server. It could be a cloud VM or a Vagrant box.
Apply this command to deploy a cluster on this server:
wget -qO- http://git.io/veKlu | sudo sh
Here we are using kube-init to deploy our cluster. It's based on the latest version of Kubernetes and we'll update it as new versions are released.
Kubernetes creates its own network inside the cluster. Each pod and service get their own IP address. It’s great because we can access their IPs from our local machine. Let's do so.
First you need to create a SOCKS proxy with your server. To do so, simply apply the following command in a separate terminal session:
ssh -D 8082 your-user@your-server-ipThis command will log you into the server. Also, it'll create a SOCKS proxy on localhost on port 8082.
Then we need to configure our browser for the SOCKS proxy we've just created. I'll show you how to do this for both Chrome and Firefox on a Mac. The instructions for Linux and Windows are much the same.
- For Firefox - (Recommended. This will add the proxy to Firefox only.)
- For Chrome - (This will add the proxy to your whole machine.)
Now we are going to deploy a pod (or an app) into the cluster. It's a Telescope app that is an open-source app like Hacker News.
First create a file called telescope-pod.json inside the server. Put this content into it:
{
  "metadata": {
    "name": "telescope-pod"
  },
  "kind": "Pod",
  "apiVersion": "v1beta3",
  "spec": {
    "containers": [
      {
        "name": "mongo",
        "image": "mongo",
        "command": ["mongod", "--smallfiles", "--nojournal"],
        "ports": [{
          "containerPort": 27017
        }]
      },
      {
        "name": "telescope",
        "image": "meteorhacks/telescope",
        "ports": [{
          "containerPort": 80
        }],
        "env": [
          {"name": "ROOT_URL", "value": "http://mydomain.com"},
          {"name": "MONGO_URL", "value": "mongodb://localhost:27017/app"}
        ]
      }
    ]
  }
}
So, basically, the above file defined a pod named telescope-pod. There are two containers inside the pod. The first one is a MongoDB container and other one is the telescope app. We've given the MongoDB URL to the telescope app via an environment variable as mongodb://localhost:27017/app.
We can access the MongoDB container port inside the telescope container. Normally we can't do this. This is possible inside a pod because a single pod shares resources with other containers. The network is one such resource.
Now simply run the following command to launch our pod:
kubectl create -f telescope-pod.json
You can check the status of your pod by running:
kubectl get pod
At first, it'll show the state of our pod as ’Pending’. That's because Kubernetes is downloading telescope and Mongo images. Wait a minute or two, then you'll see the state as ‘Running’.
Here's the output when I run kubectl get pod:

Here, you can see an IP address assigned to your pod. That's the IP address for your pod. Copy and paste it into the browser configured with the SOCKS proxy. Now you can access our telescope app. :)

We've just tried Kubernetes. There is a lot more to learn. Look at other Kubernetes articles and videos, and try those commands with our test cluster.
I've also written two lessons on Docker and Kubernetes for BulletProof Meteor. Even though this is a learning platform for Meteor, to follow these lessons you don't need to know Meteor at all. Here are some of the things we are looking at.
- Installing Docker
- Understanding Basic concepts (images, containers, etc.)
- Running containers in different ways (named, background services, auto-restart)
- Building images (with docker commit and docker build)
- Managing Ports
- Publishing containers and Docker registries
- Introduction to Kubernetes
- Deploying our first Kubernetes cluster
- Deploying the telescope app (as a pod) in a cluster
- Using a replication controller for high availability and scalability
- Changing replicas
- Kubernetes services for load-balancing pods
- Deploying our own MongoDB service
- Deploying a new version with a rolling update
- Microservices with Kubernetes
You can complete these lessons in a few hours and they are task oriented. So, you don't need to waste your time watching videos or reading a lot of text. I bet you'll like them. Here are those two lessons:
Now, you've a solid idea of what Kubernetes is. So, do you also think it's the future of cloud hosting?
Imagine that every cloud provider and software like MongoDB supports Kubernetes by default. I don't think we will need to wait a decade to see this.
Let's discuss.